How to Change Your Domain Name Servers

Nameservers tell the global domain name system where to look for a particular website. This may sound a bit technical, but changing nameservers is actually a fairly straightforward process.
In this article, we’ll show you how to easily change domain nameservers and point to a different host or firewall, step by step.
What Are Nameservers?
Nameservers are part of the global database of domain name system. Their job is to tell other computers where to find a domain name.
If your web hosting account is the house where your website files live, then the domain name is the street address of that house.
Nameservers tell the internet where to locate the website address associated with a domain name.
When you enter a domain name in your web browser, it first sends a request to a global network of servers that form the Domain Name System (DNS).
These servers then search for the respective nameservers associated with the domain and forward the request accordingly.
These name servers are computers managed by your website hosting service provider. Your hosting company will forward the user’s request to the computer, also known as server, where your website is stored.
Why and When Do You Need to Change Domain Nameservers?
There are two primary reasons why you would need to change your nameservers:
- You’re switching your web hosting providers
- You’re adding a web application firewall like Sucuri or Cloudflare to protect your website
When you move your website to a new hosting company, you will need to change the nameserver information for your domain name, so that it points to the new hosting location.
This is extremely important because often your old hosting company will delete your files after your plan expires. If you don’t change the nameserver, then your users will not be able to find your website.
When you’re implementing a web application firewall (WAF), the WordPress WAF plugins will ask you to point your nameserver to them.
This is a required step for all web application firewall like Sucuri or Cloudflare because it helps them protect your website server from attacks by blocking it at the DNS level.
Aside from these two common reasons, you will rarely ever have to change your nameservers. Although, you may need to add DNS records such as changing MX records for your professional email address, etc.
That being said, let’s take a look at how to easily change your domain’s nameservers and point them to your new host.
How to Change Your Domain’s Nameservers
Changing your nameserver is quite simple and easy. The process may look a little different to you depending on your domain name registrar, but the basic steps are the same.
Before editing your nameservers, you need to know the new nameserver records to use. Your new web host should be able to tell you this.
Nameservers will usually look like ns1.bluehost.com and ns2.bluehost.com. Some web hosts use IP addresses instead.
Tip: It can take a few hours for nameserver changes to take effect. Please be patient, if your website isn’t showing up at your domain right away.
Changing Your Nameservers with Domain.com
Domain.com is one of the most popular domain registrar. It’s easy to register a domain with Domain.com and host it elsewhere.
To change your nameservers, you first need to log in to your Domain.com account. After that, you must click the ‘DNS & Nameservers’ link in the left hand sidebar.
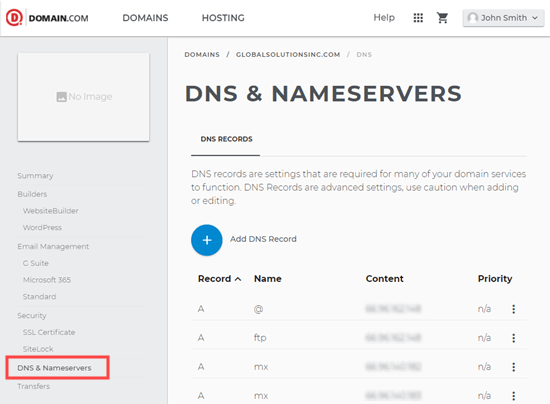
This will take you to a page where you can see your DNS records.
Before you start, make sure the correct domain is selected at the top of the screen in the breadcrumb navigation.
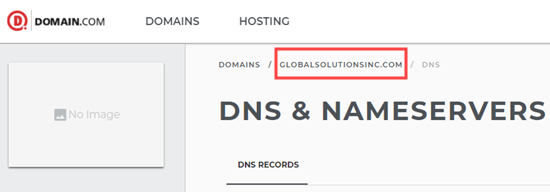
Once you have verified the domain is correct, simply scroll down until you reach the NS records. There should be 2 of these, ns1.domain.com and ns2.domain.com.
First, click the 3 vertical dots next to ns1.domain.com then select Edit.

You will see a popup where you need to edit the nameserver record. Simply type the new nameserver in the ‘Content’ box then click the ‘Update DNS’ button. Here, we’re using Bluehost’s nameservers:
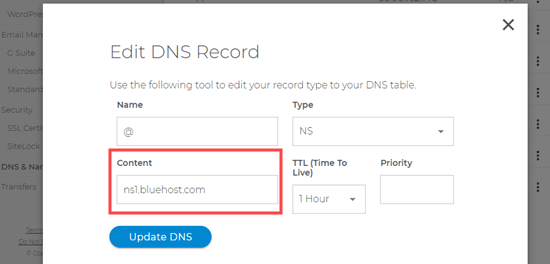
Repeat the same process for the ns2.domain.com nameserver record too.
You will see your updated nameservers in the list.

That’s all you need to do to point your website domain to your new host.
Changing Your Nameservers with Bluehost
Bluehost is a popular WordPress web hosting company. They are also a domain registrar. If you have a domain registered at Bluehost, it’s easy to change your nameservers.
First, you need to log in to your Bluehost account. Next, click the Domains tab on the left-hand side. You should see your website domain(s) in a list. Simply click the dropdown next to your domain then select DNS.
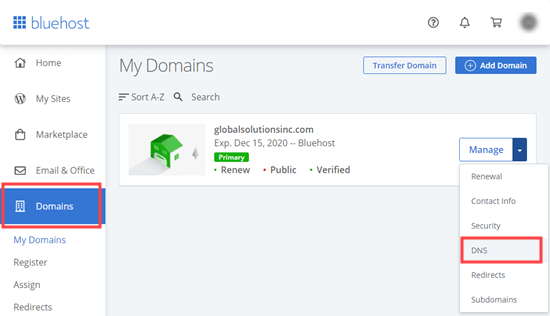
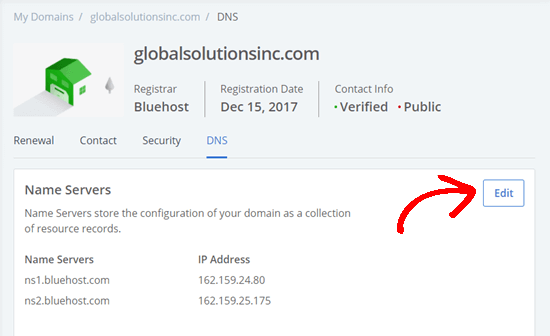
You will now see the DNS details for your domain in Bluehost. Go ahead and click the Edit button next to these.
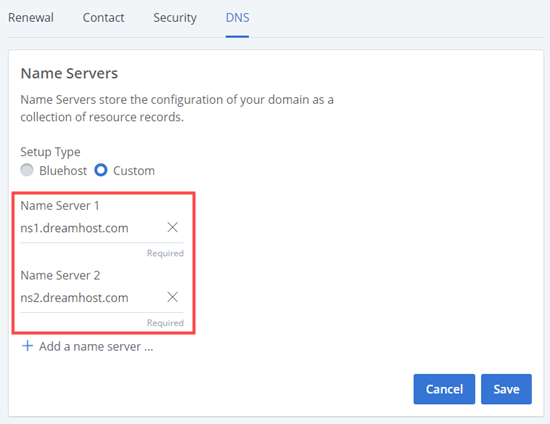
Now, you need to click the ‘Custom’ option and enter the nameservers for your new web host. Next, click the Save button.
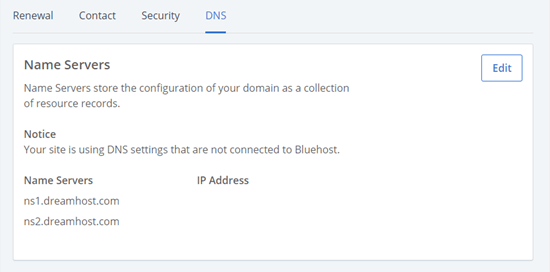
You will then see the updated nameservers in the list:
That’s all you need to do. Your website domain is now pointing to your new web host.
Congratulations, you have successfully changed name servers on Bluehost.
Changing Your Nameservers with SiteGround
SiteGround is a well-known premium WordPress hosting company. We use them to host WPBeginner website.
They also offer domain name registration as part of their web hosting platform.
To change your nameservers in SiteGround, you first need to log in to your SiteGround account.
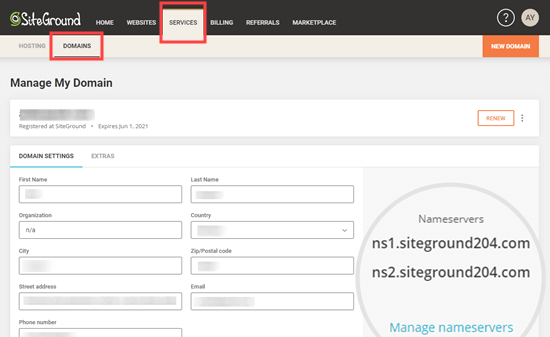
Next, click go to the Services » Domains page and click the ‘Manage nameservers’ link for your chosen domain.
In the popup window, simply delete the existing SiteGround nameservers and enter the new ones you want to use. Optionally, you can add a third and fourth nameserver.
Once you’re ready, go ahead and click the Confirm button.
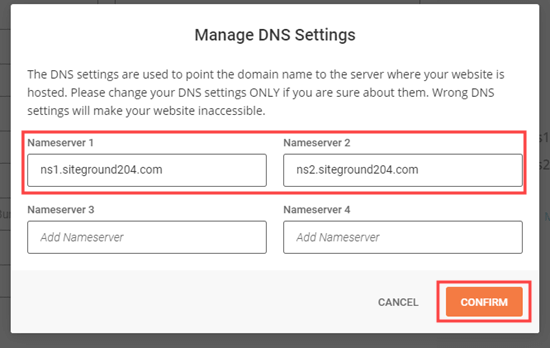
Your new nameservers will now display next to your domain name.
Congratulations, you’ve now changed your domain name servers on SiteGround.
Changing Your Nameservers with HostGator
HostGator is another popular web hosting company and domain registrar.
To change your nameservers on HostGator, you need to log in to your HostGator account.
Next, you need to click the Domains tab, and then click the name of your chosen domain to see further details.
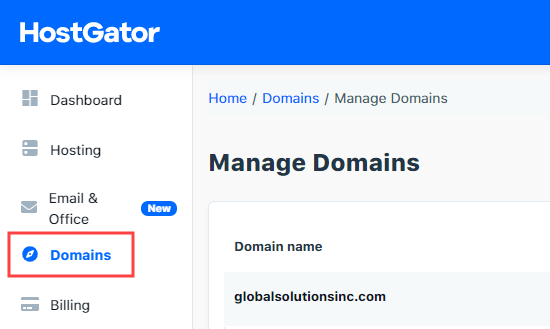
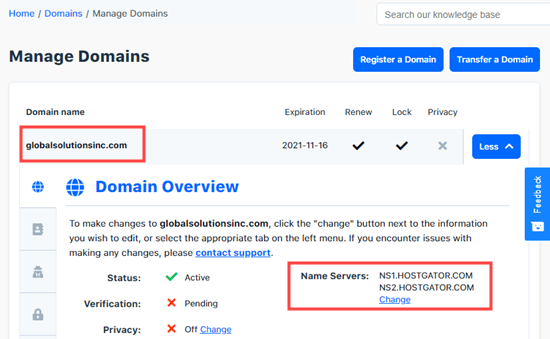
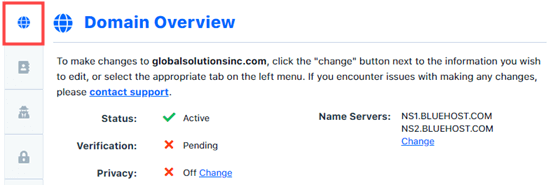
You will now see an expanded details section below your domain name. Here, you just need to click on the ‘Change’ link below your nameserver details.
You will now see two new boxes will appear for the nameservers. You simply need to enter your nameservers in these boxes and press the ‘Save Name Servers’ button.
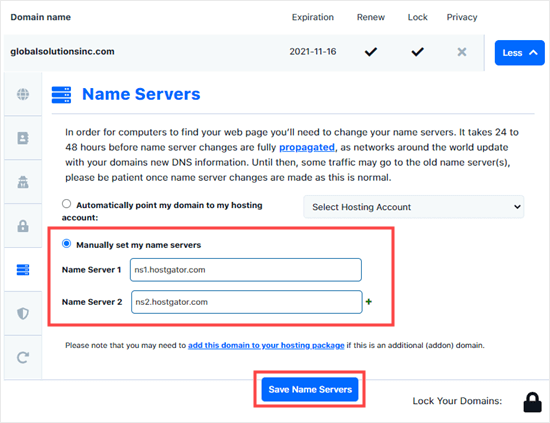
The boxes will then turn green to indicate that the nameserver change has been saved. If you return to the domain overview, you will see your new nameservers in the list:
Congratulations, you have successfully changed name servers on HostGator.
Changing Your Nameservers with GoDaddy
GoDaddy is one of the best-known hosting and domain name companies.
To change your nameservers, you first need to log in to your GoDaddy account.
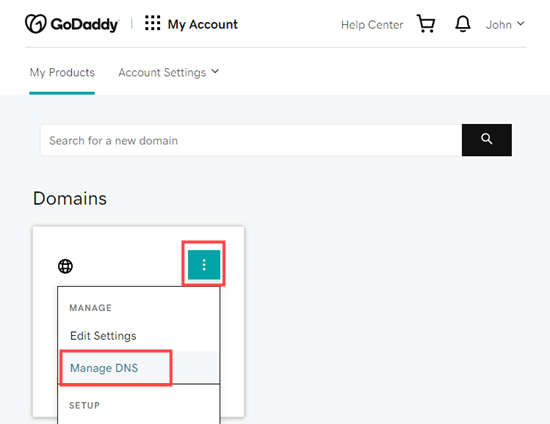
You should see your domains listed on the home page. Simply click the 3 vertical dots for your chosen domain and select the ‘Manage DNS’ option.
Next, you need to click the ‘I’ll use my own nameservers’ option and enter the nameservers that you want to use. You can add more than 2 by using the ‘Add Nameserver’ button.
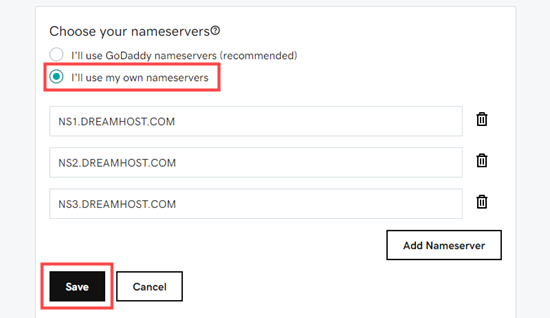
Once you’re done, just click the Save button.
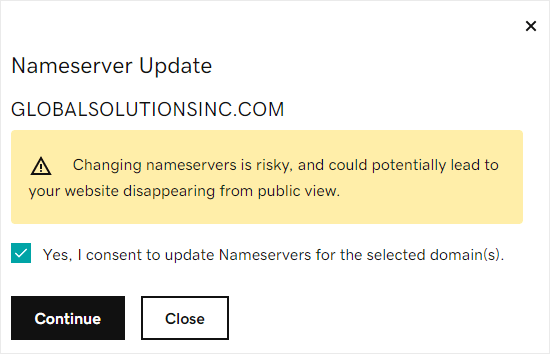
GoDaddy may bring up a warning prompt to confirm. Just check the box, and then go ahead and click the Continue button. Your nameservers have now been changed.
Congratulations, you have successfully changed name servers on GoDaddy.
Changing Your Nameservers with Namecheap
Namecheap is another top-rated domain name company that offers great value domains.
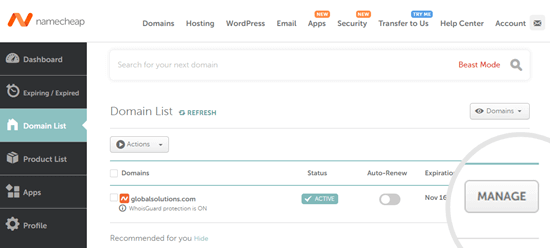
To change your nameservers, you first need to log in to your Namecheap account. Next, click the ‘Domain List’ tab and then click the Manage button next to your chosen domain.
After that, you need to scroll down to the Nameservers section of the page. Here, you need to click on the dropdown list and select the ‘Custom DNS’ option.
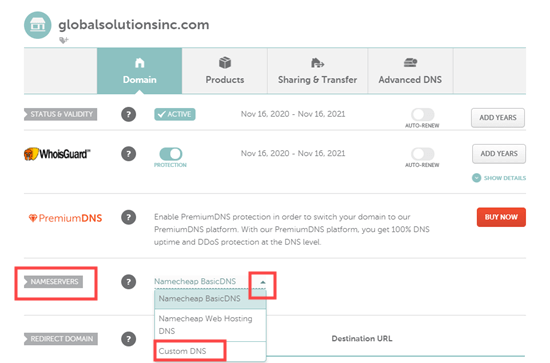
Simply add in your nameservers here, then click the check button.

Your new nameservers will now display in the list.

Congratulations, you have successfully changed name servers on Namecheap.
Final Steps After Setting Up Your Domain Nameservers
Any domain nameserver changes can take a few hours to take in effect worldwide. That’s because it requires each internet service provider to clear their cache history and update the IP address to new records.
If this is your first time changing nameservers, then it’s important that you exercise patience because often the changes will not reflect right away.
If it’s been a few hours, and your nameserver changes are still not showing up, then you can try to flush your DNS cache on your computer.
We hope this article helped you learn how to change nameservers and point a domain to another host.