How to Embed Tweets in WordPress

Do you want to learn how to embed tweets in WordPress? In this tutorial, we’ll take you step-by-step and show you how to add tweets to your blog.
As soon as you start a blog, you need to come up with ways to promote your content and boost engagement with readers. And social media is an excellent tool to use.
To make it even more powerful, you can combine your social media content with your blog. For example, adding Twitter feeds to your site will help you keep your site updated with fresh content, increase traffic, and grow your social media following.
If you need help with adding actual tweets in WordPress, you’re in the right place.
In this tutorial, we’ll show just how easy it can be to embed tweets into your WordPress blog with a WordPress tweet plugin and without a plugin.
Before diving into the official tutorial, it’s important to understand why embedding tweets into your blog is a good idea. Without understanding the benefits, you might miss out on some of the different ways you can use social content on your website to boost traffic and engagement.
Why Embed Tweets in Your WordPress Blog?
There are several reasons why it’s helpful to add tweets to your WordPress website and blog posts.
- Increase Engagement
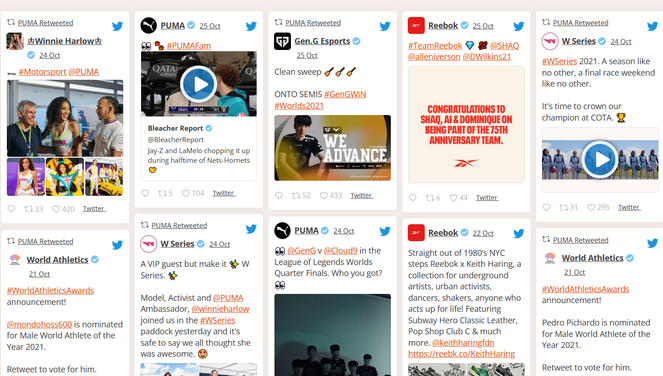
Offering various forms of media in your blog content can help you increase user engagement on your site as well as your social platforms. The more users engage with your content, the likelier they are to come back.
- Boost Social Media Following
It’s important to grow your social media following since it’s an easy and relevant way to stay in touch with your audience. Sharing social content on your site can lead readers to your social profiles and encourage them to follow, comment, and like.
- Build Brand Credibility
For beginner bloggers, it’s crucial to build brand credibility quickly so you can grow your audience and boost conversions. When visitors see that you have an active Twitter account with engagement of its own, it shows that they can trust your brand.
- Show Social Proof
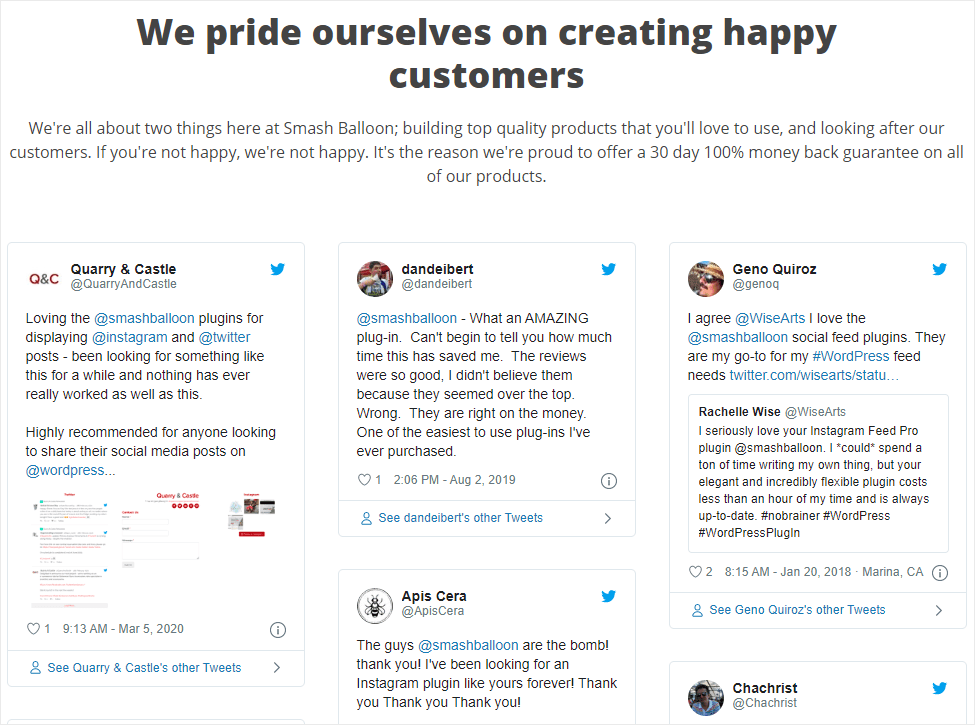
If your readers share praise for your blog on Twitter, you can retweet those testimonials and then create a feed to show them off on your blog. This helps build social proof. When other website visitors see that people are enjoying your blog, they’ll be more likely to stick around and become fans too.
Now that we know some of the benefits of embedding social content into WordPress, let’s get started with the tutorial.
We’ll show you two different ways to add tweets in WordPress…
How to Embed Tweets in WordPress with Smash Balloon (The Easiest Way)
The easiest way to embed Twitter feeds into your blog is to use a plugin like Smash Balloon.

With Smash Balloon’s Custom Twitter Feeds Pro, in minutes, anyone can create a stunning, visual Twitter feed and add it to their website. And best of all, you don’t have to touch a line of code.
Not only is it easy to use, but you get a lot of customization options that you aren’t able to take advantage of when you embed tweets without a plugin.
There are 6 different feed layouts to choose from, it will automatically make a “Twitter card” so that your tweets stand out, you can combine multiple feed types, and more.
Plus, when you display a Twitter feed on your blog using Smash Balloon, visitors can like, retweet, and reply to tweets without leaving your site.
Smash Balloon’s Custom Twitter Feeds Pro comes with other powerful features including:
- Infinite tweet loading
- Multiple design options
- Responsive and mobile-optimized
- GDPR compliance
- Post caching for fast load times
- Automatic tweet moderation
- And more…
Custom Twitter Feeds Pro by Smash Balloon is the perfect solution for beginners looking to add tweets to their website.
Smash Balloon also offers plugins for embedding feeds from Instagram, Facebook, and YouTube.
Now, we’ll show you how to embed tweets in WordPress with Smash Balloon…
1. Install Custom Twitter Feeds Pro by Smash Balloon
First, you need to purchase and download Smash Balloon’s Custom Twitter Feeds Pro.
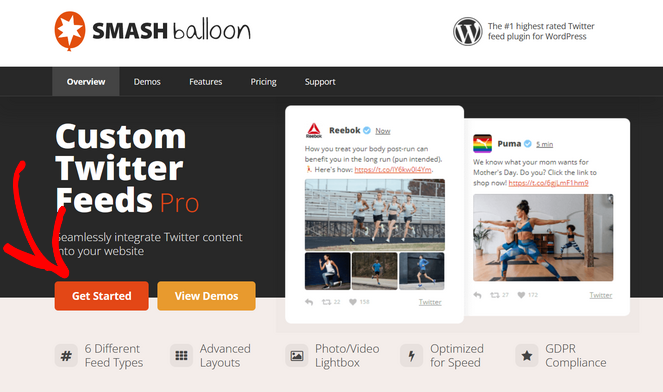
To do that, simply click on the Get Started button on the Smash Balloon website and choose your pricing plan:
Once you’ve purchased the plugin, you can install and activate it on your site.
Smash Balloon also offers a free version of the plugin that you can get started with. But, the free version doesn’t come with as many features as the paid version.
So, for this tutorial, we’ll be using Custom Twitter Feeds Pro.
2. Connect Your Twitter Account
After installing and activating the plugin, next, you need to connect your Twitter account so the plugin can retrieve your information.
From your WordPress dashboard menu, click on Twitter Feeds. You’ll then see the Configure page.
Click the blue button that says Log in to Twitter and get my Access Token and Secret:

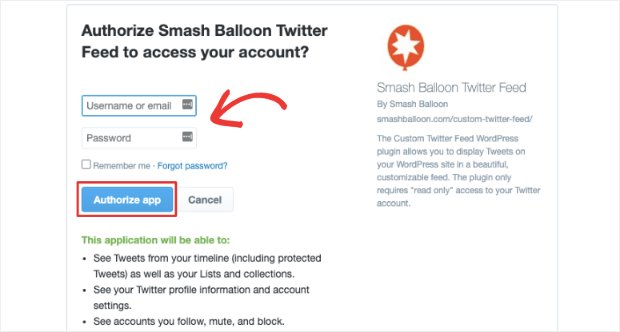
This will open up a window that prompts you to log into Twitter with your username and password. Then, click on Authorize app to allow Smash Balloon to see your account’s tweets and profile information.
Next, Smash Balloon will return you back to your WordPress dashboard. You will see that the plugin has automatically added your access token and access token secret to the appropriate fields.

Simply click on Save Changes and then your Twitter account will be successfully connected to your WordPress blog!
3. Set up Your Twitter Feed
Next, on the same Configure page that you’re already on, scroll down to the Feed Settings section where you can choose the type of feed you’d like to display on your blog:
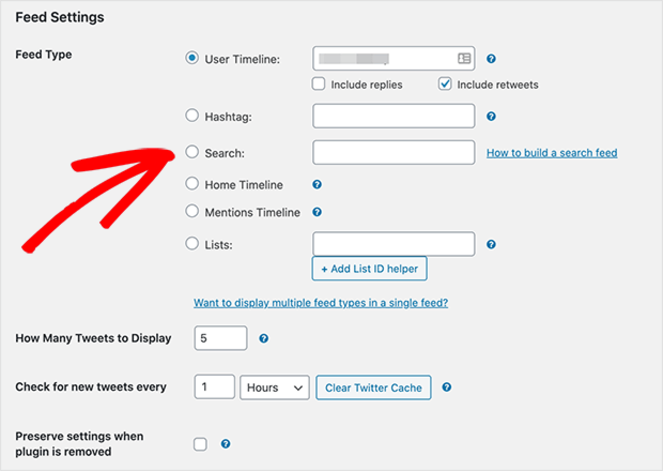
The types of Twitter feeds you can choose from include:
- User Timeline: Displays most recent tweets and/or retweets from a Twitter account.
- Hashtag: Displays specific hashtags in a Twitter feed.
- Search: Displays the results of an advanced Twitter search shown in a feed.
- Home Timeline: Displays the most recent tweets from your account and accounts you follow.
- Mentions Timeline: Displays tweets where your account is mentioned by others.
- Lists: Displays a feed based on your Twitter lists.
When deciding on the type of Twitter feed you’d like to display on your blog, consider the goals you want to achieve. For example, if you want users to have a better idea of who your brand is and what it’s all about, you could choose the User Timeline options. If you want your audience to see how other people interact with you, you could choose the Mentions Timeline.
Once you choose, you can then set the number of tweets you’d like to show on your website. You can also pick how often your feed refreshes, which is a good option for users who post often and want to display their most recent posts.
Once you click Save Changes, it’s time to move on to the next step.
4. Customize Your Twitter Feed
Now it’s time to customize your Twitter feed so it displays exactly how you want it to on your website.
Because Smash Balloon’s Customer Twitter Feeds Pro offers various display options, it helps you create a social feed that’s truly your own. This makes it easier to capture your audience’s attention and encourage them to take action on your blog.
From your WordPress dashboard, click on Twitter Feeds » Customize and you’ll see this page:

You can adjust the width and height of your feed, add custom CSS, or disable the lightbox.
Then, choose between 3 layouts:
- List: A list of tweets spanning the full width of your website’s content area.
- Carousel: A slideshow of tweets from your feed. You can customize the number of columns that display on mobile and desktop, loop types, arrow types, and carousel height.
- Masonry: Tweets are displayed in columns without space in between posts. You can also customize for desktop and mobile.
When you scroll down, you’ll see more customization options:
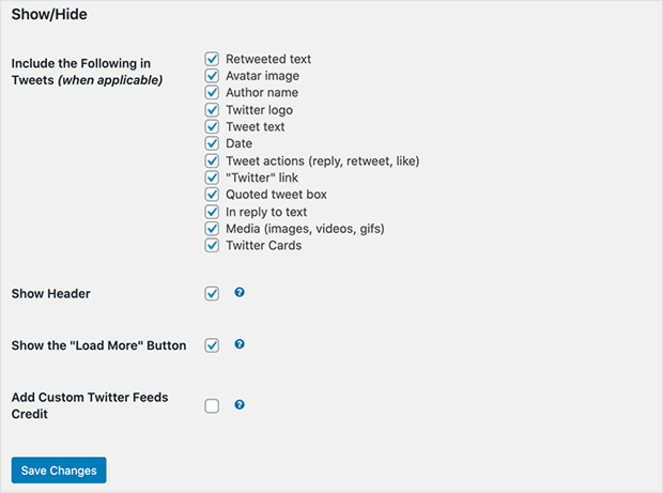
You can choose to show or hide certain elements of your Twitter feed, including:
- Avatar image
- Twitter logo
- Tweet text
- Retweeted text
- Media (images, videos, and GIFs)
You can also show a header, show a “Load More” button, and add custom Twitter feeds credit.
In the next area, you can show or hide tweets containing specific words, phrases, or hashtags. You can also hide specific tweets by entering the post id.
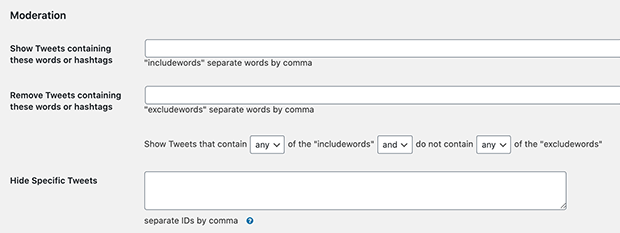
Including and excluding certain keywords and hashtags allows you to cater to a specific audience and control the content in your Twitter feed.
Once you save your changes, it’s time to move on to the next step.
5. Style Your Twitter Feed
Next, we’re going to style your Twitter feed by going to Twitter Feeds » Style from your WordPress admin. You’ll then see these options:

Here, you can set basic styling options such as your feed’s background color, tweet’s background color, header background color, and header text color. You can also choose to show your Twitter bio and insert custom header text.
Feel free to mess around with different styles until you find the one that works for your blog and your WordPress theme. It’s important to maintain a cohesive look for your feed that aligns with your branding and resonates with your readers.
Once you’re satisfied, click Save Changes.
6. Embed Your Twitter Feed in WordPress
Last but not least, it’s finally time to embed your Twitter feed into WordPress and show visitors your customized social content.
With Custom Twitter Feeds Pro, you can embed your feed by:
- Displaying it in a WordPress post
- Embedding it into a WordPress page
- Adding it to your WordPress sidebar or footer as a Twitter widget
We’re going to show you all of these methods so it’s easy as pie no matter what you choose.
Embed Your Twitter Feed in a Post or Page
To embed your Twitter feed in a WordPress post or page, go to either Pages » Add New or Posts » Add New from your WordPress dashboard.

In the top left corner, click the Plus icon (+) which will add a new content block to the page. Under the Widgets tab, click Twitter Feed and it’ll embed to your WordPress page.

Before you publish, you can see a live preview of your Twitter feed so you know how it will look:

Add a Twitter Feed Widget to Your Sidebar
To embed a Twitter feed into your sidebar or footer, go to your WordPress admin and click Appearance » Widgets.
Click the Plus icon (+) and search for the Custom Twitter Feed widget. Then, click on the widget to add it to the widget-ready area of your site.
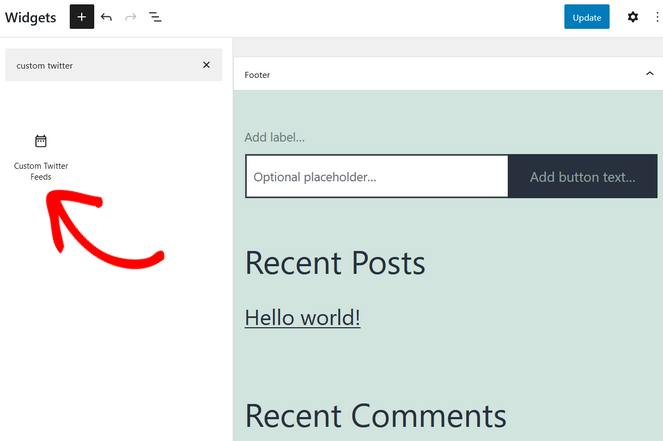
You can move the widget exactly where you want by dragging and dropping it into place.
Click Update to lock your changes in place. When you preview your feed, it should look something like this:
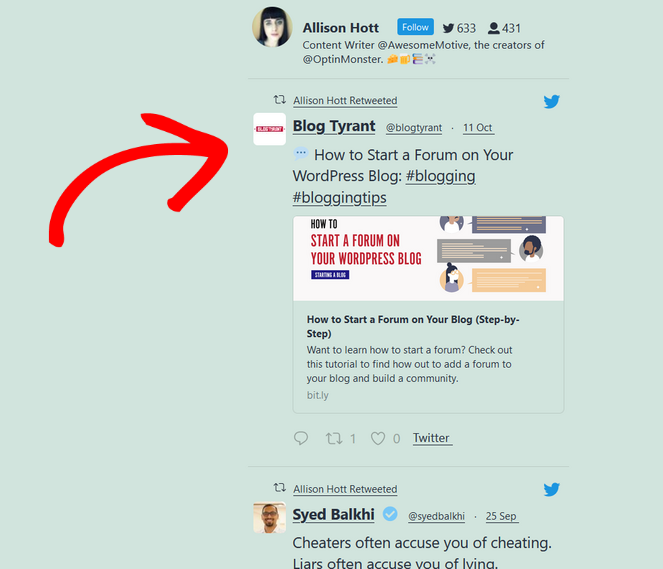
That’s it! Now you have a beautiful Twitter feed on your blog.
If you don’t want to use a plugin like Smash Balloon to add a Twitter feed to your site, we’ll also show you an alternative method…
How to Embed a Twitter Feed in WordPress Without a Plugin
You can use HTML to manually embed your tweets into WordPress. Twitter allows you to copy and paste code snippets onto your site, but you might not want to do that.
There are a few disadvantages to manually embedding a Twitter feed in WordPress, such as:
- Higher Difficulty: Manually adding tweets to your blog takes more steps and requires you to switch between posts and pages. A plugin like Custom Twitter Feeds Pro takes away the pressure of coding and makes it easy to embed tweets in a few simple steps.
- No Customization: Using HTML doesn’t allow you to customize your Twitter feeds so they match your WordPress theme and go with your website. Smash Balloon’s Custom Twitter Feeds Pro comes with different layout options to make your feed one of a kind.
- Subject to Errors: You’re likelier to run into errors when manually adding tweets to WordPress since there’s no way to track what you’re doing. You might accidentally mess up the code or or put it on the wrong page, for example. With Custom Twitter Feeds Pro, you don’t have to worry about making simple mistakes because it’ll alert you to any potential issues.
- No Filters: You can’t filter your feed to hide and show certain content, which gives you less control over its display. Custom Twitter Feeds Pro gives you various ways to customize your feed and show exactly what you want your audience to see.
Using a plugin comes with many advantages and simplifies the process of customizing and embedding tweets into WordPress.
But, if you still want to embed your tweets manually, we’ll show you how.
1. Go to Twitter Publish
You’ll first need to visit Twitter Publish, an official website by Twitter. It allows you to generate HTML embed code for different feed types so you can manually insert them anywhere.

2. Choose an Embed Type
Next, you’ll need to choose from 3 embed types: Embedded Tweet, Embedded Timeline, or Twitter Buttons.
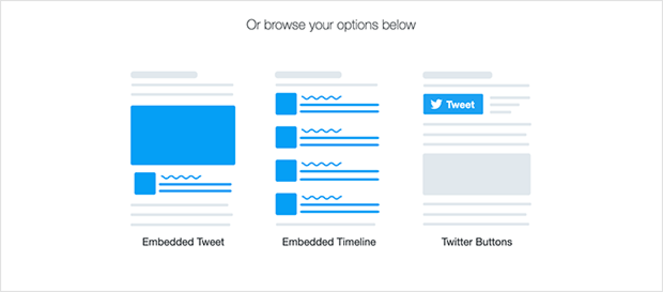
Pick the one you want and move on to the next step.
3. Paste Your Twitter URL
Now you need to add the URL of the Twitter timeline you want to embed and click Preview:

4. Copy Your HTML Code
When you click Preview, you’ll be able to see what your timeline looks like. There will be a box with HTML code.
Click Copy Code to save the code to your clipboard.
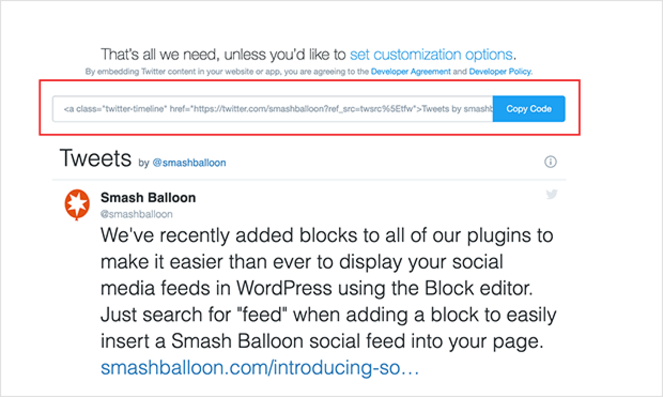
5. Paste the HTML in WordPress
The last step is to paste the copied HTML code into WordPress. To embed the code in a WordPress post, head to Posts » Add New and click the Plus icon (+) to add a new content block.
Click on the Custom HTML block:
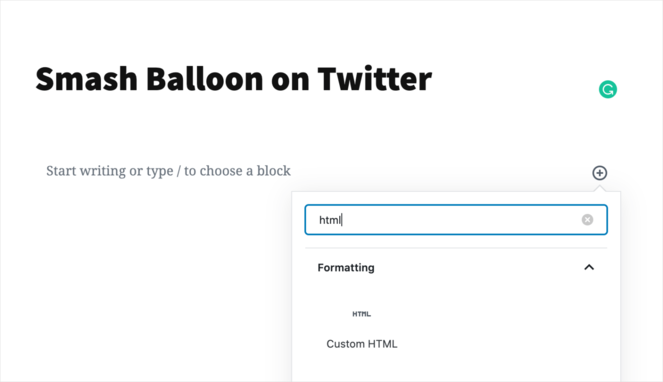
Paste the copied HTML code into the content block and click Publish:

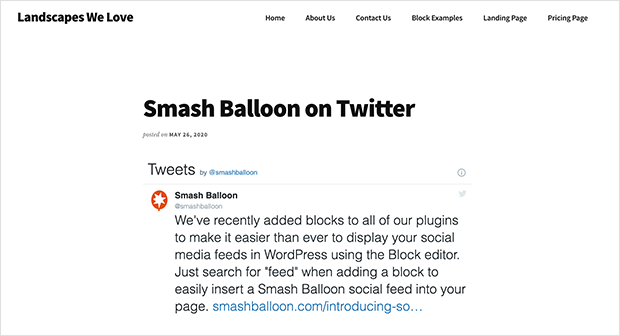
When you view the live post, you’ll see your Twitter feed right along with it:
And there you have it!
You now know a couple of different methods that will allow you to embed Twitter feeds into your blog. Doing so will help you boost engagement, grow an audience, and much more.