How to Translate Your WordPress Site Automatically
Have English website content but want to include non-English speakers? Live in a country that speaks multiple languages and want to translate WordPress to include them all?
This guide will walk you through the why and how of language translation using WordPress.
By the end of this page you will know why you should translate WordPress into different languages. You will also know how to do so using a WordPress plugin and a mixture of automatic and human translation.
Benefits of Translating Your WordPress Website
The internet and the world wide web were invented in English-speaking countries. The first websites and the early web were developed and quickly adopted by English-speaking countries.
But the world speaks over 7,000 languages and English is just one of them.
Depending on where you look, statistics state that English is the primary language of only around 25% of internet users. Other major languages in use online include Chinese (19.4%) Spanish (7.9%), Arabic (5.2%) and Indonesian / Malaysian (4.3%).
If your website only caters for English speakers, you could be missing out on a huge potential audience. Whether your motivation is commercial, educational or something else, that’s a large portion of the world excluded from your content!
That is reason enough to want to translate WordPress.
There are also some other reasons you might want to translate your website.
- Boost your SEO traffic
- Improved user experience
- Better conversions
Boost SEO Traffic
Whatever type of website you run, a boost to your SEO is a universal benefit. Translated pages on your site will be crawled in the same way as your English pages but will be regarded as separate and be used in local language search results.
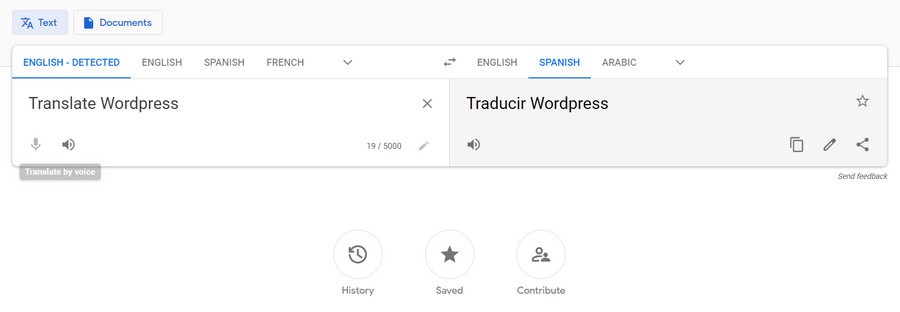
For example, if this page was translated into Chinese and Spanish, it would rank in the search engines for ‘translate WordPress’. It would also rank for ‘翻译 WordPress’ (simplified Chinese) and ‘traducir WordPress’ (Spanish).
The term ‘translate WordPress’ is competitive in English but not so competitive in Chinese or Spanish. Including the translated content means the site is suddenly competing in markets it stands a far higher chance of dominating for SEO.
Improved User Experience
As a native English speaker, I tend to take the internet for granted. Most websites I visit are in my language and I rarely give it a second thought. It’s only when writing articles like this that I consider the rest of the world and how they have to adapt to the internet rather than the internet adapting to them.
Translate your WordPress website and that doesn’t have to happen. Visitors who speak other languages will feel included and will likely repay your thoughtfulness with more frequent visits and perhaps, conversion.
Better Conversions
Conversion is all about turning a website visitor into a customer. If that visitor speaks English as a second language, many of the traditional conversion techniques are less effective because they are optimized for English speakers.
Translating content into local languages along with those conversion messages can only help convert more.
How to Decide Which Languages to Translate Your Site Into?
If you’re looking to widen your website’s appeal, you may have to put some thought into exactly what languages to translate WordPress into.
You Live in a Country That Speaks Multiple Languages
If you live in a country that speaks multiple languages, those chosen languages are very likely to be your local ones. You could expand those languages eventually, but chances are, you’re going to want to cover your local market first.
Google Ads Keyword Planner Traffic Sources
If you’re just after a wider audience, you can use Google Ads Keyword Planner to identify languages with low competition for keyword terms.
In the example we used above, we already know that some keyword terms in English can be highly competitive. Translating them into different languages can allow you to compete much more effectively.
Google Analytics
You can also use Google Analytics to identify where your visitors are coming from and target those. You can use the ‘Geo’ reports in the Audience section of Google Analytics to identify where visitors come from.
- Log into Google Analytics
- Select Audience from the left menu
- Select Geo and Location
If you’re receiving international visitors, you can identify them from the data provided there.
Choosing a Solution for Translating Your WordPress Site
WordPress itself is translated into over 200 languages. This means you can set up WordPress so the back end is in your native language. But what about the rest?
You also need to translate your content into your language(s) of choice so your visitors can read in their native language too.
You have several options if you want to translate WordPress.
- You can use automatic translation tools such as Google Translate, Linguee or Yandex Translate.
- You could use human translators. Professionals who speak your language and another language to such a degree that they can accurately translate one to the other.
- You could use a WordPress plugin such as TranslatePress, Polylang or GTranslate.
Automatic translation tools are fast and cheap but notoriously inaccurate.
Human translators are the most accurate but are more expensive and slower than automatic translation.
Using a WordPress plugin can make life easier but still come with their own complications.
Most WordPress plugins will require you to build separate pages for every language, by hand. Even if you use a page builder, that’s a lot of work!
Or you could use a combination of automatic translation, manual translation and a specific WordPress plugin that doesn’t require quite so much work.
Use a Plugin to Translate WordPress
For speed, efficiency and ease of use we recommend using a plugin called TranslatePress to help translate WordPress. It uses a simple drag and drop page editor to help create translated pages.
So while you still have to create them manually, it’s the work of minutes rather than hours.
The plugin can then provide translations either on demand or by detecting the language used in the visitor’s browser.
We consider this by far the most efficient option.
What to Translate in WordPress?
Before we get to the actual translation, what exactly should you translate on your website?
We suggest translating the main site content, SEO metadata, URLs and any relevant images.
Translated Content
Translated content is at the heart of this exercise as we want to widen the appeal of a website. Aim to translate as many pages and posts as possible.
If you also run a WooCommerce store, you should also translate all of your store pages.
SEO Metadata
Translated SEO metadata is also important as you want your newly translated content to be indexed and ranked. Metadata is key to that.
URLs
If you follow SEO guidelines and have keywords in your URLs and use the ‘/%postname%/’ in WordPress, you will need to translate the URLs to accurately reflect the translated keywords and post titles.
You can find your URL settings in the WordPress dashboard under Settings > Permalinks.
Images
If your images contain text or have words, you should switch them to localized versions to avoid confusion. Consider the local culture in terms of image use and image subjects.
Finally, don’t forget to change the image alt text to maximize your SEO gain.
How to Translate WordPress Site Visually Using TranslatePress?
Using a WordPress plugin to translate WordPress sites is the easiest way to do it as far as we are concerned. It avoids the pitfalls of automatic translation while being easier to manage than creating separate pages for every language.
As long as you combine the plugin with content translated by professionals, you will soon be attracting a much wider audience.
While there are many translation plugins out there, we like TranslatePress. It works slightly differently than most translation plugins. Rather than creating the same article over and over in each language, TranslatePress uses a live editor to help you translate your content.
Let’s walk through the entire process of translating a WordPress website. We’ll build a site from scratch, install the plugin and set everything up ready for translation. As we will also be covering translating WooCommerce products, we will cover setting up your store too.
You will need:
- A fully operational WordPress website
- WooCommerce installed (optional)
- Translated content (we can translate some automatically but recommend more complex content be translated by human translators)
- Some time and patience
You can hire freelance translators from websites like People Per Hour, Upwork, Gengo and other marketplaces. Use your judgement when hiring and always read reviews!
Setting up Your Website and Store
We won’t go into setting up WordPress and a web host as we have already done that here. We will cover the other fundamentals of a website though.
- Log into your WordPress installation
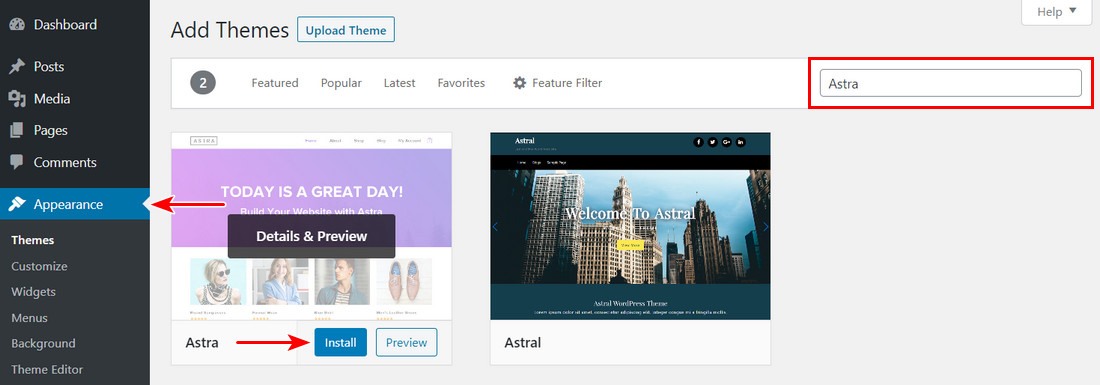
- Select Appearance, Themes and Add New
- Select Astra and install the theme
- Select Activate when the option is available
- Select a theme from the range of excellent options. We installed Brandstore as it includes everything necessary to run a website and store
- Select Plugins and Add New from the left menu
- Type ‘woo’ into the search box at the top right
- Select WooCommerce and Install Now
- Select Activate once the option becomes available
We go into a lot more detail on setting up a WooCommerce store in this article so we won’t repeat ourselves here.
Installing TranslatePress
Our final piece of preparation is to install and set up TranslatePress.
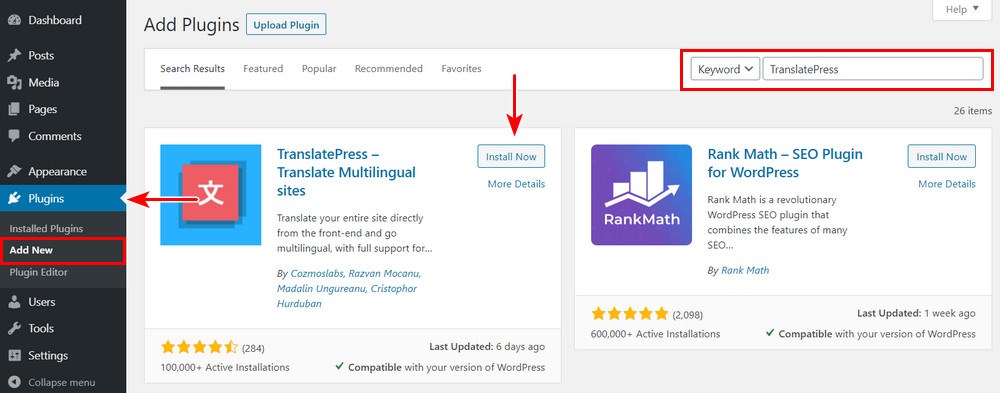
- Select Plugins and Add New from the left menu of your WordPress dashboard
- Type ‘TranslatePress’ into the search box at the top right
- Select TranslatePress and Install Now.
- Select Activate once the option becomes available
You should now see a new entry called TranslatePress inside the Settings menu on your WordPress dashboard.
Before we proceed, we need to add our licence key in order to use the full power of TranslatePress.
The free version lets you translate a single language. To offer multiple languages, you will need to use the premium version of the plugin.
- Select TranslatePress from the WordPress dashboard and select the Addons tab at the top.
- Select the Multiple Languages option and you will be taken to the TranslatePress website where you can sign up for a premium account.
- Once done, enter the licence key you are provided into the licence tab within the TranslatePress page in WordPress.
Setting up TranslatePress
Now we have a website, WordPress theme, WooCommerce and TranslatePress installed, we can get on with configuring how everything works.
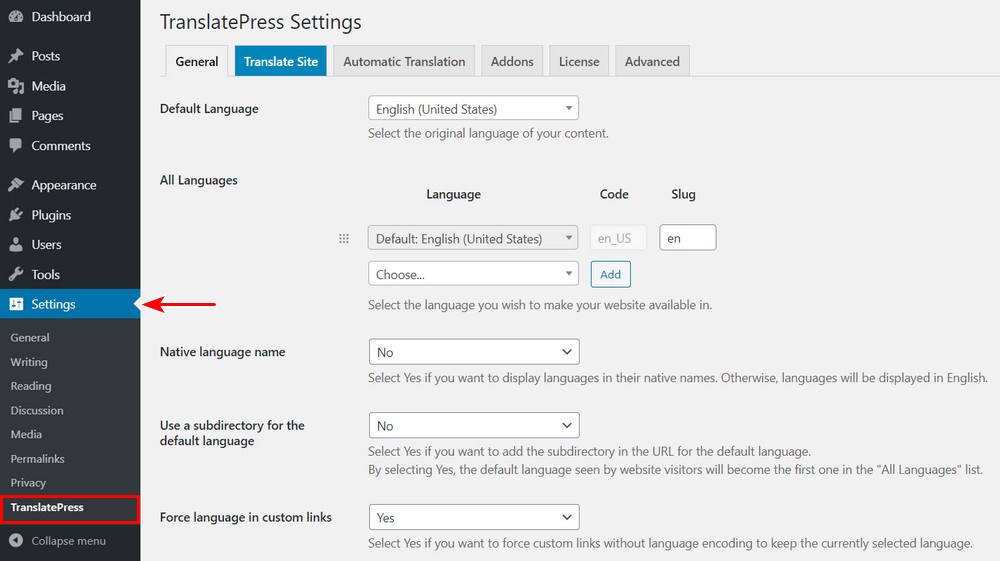
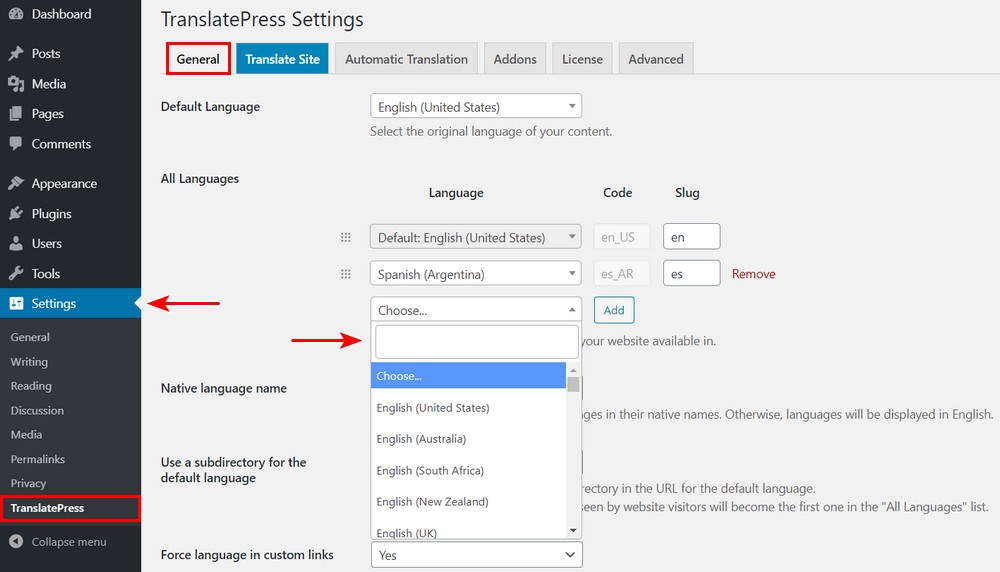
- Select Settings and TranslatePress from the left menu of your WordPress dashboard
- Select the default language you want your site to use.
- Select the languages you want to translate into under All Languages.
You can leave the other settings as defaults if you like as they all work well. You may like to check the Language Switcher type to make sure it fits your needs but we’ll cover that more in a little while.
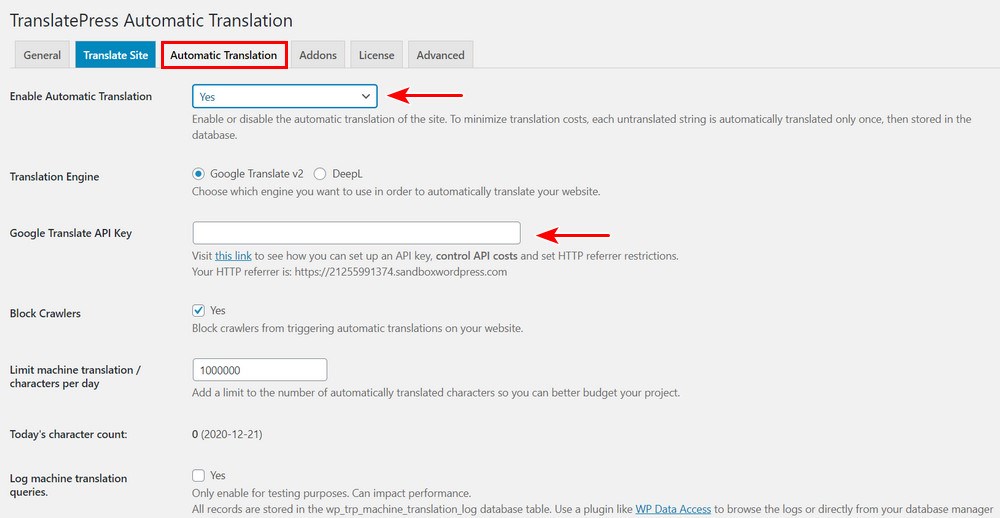
- Select the Automatic Translation tab
- Select Yes by Enable Automatic Translation
- Select either Google Translate or DeepL. We suggest using Google Translate as DeepL requires the premium version of TranslatePress but it is entirely up to you.
- Select the link under Google Translate API Key to acquire a key. Enter it into the box when you’re done
- Select the blue Save Changes button at the bottom of the page
Selecting a URL Structure
If you don’t already use the /%postname%/ URL structure, you should do that now. Just bear in mind that if you have an established website, it will require more work to ensure all links function normally afterwards.
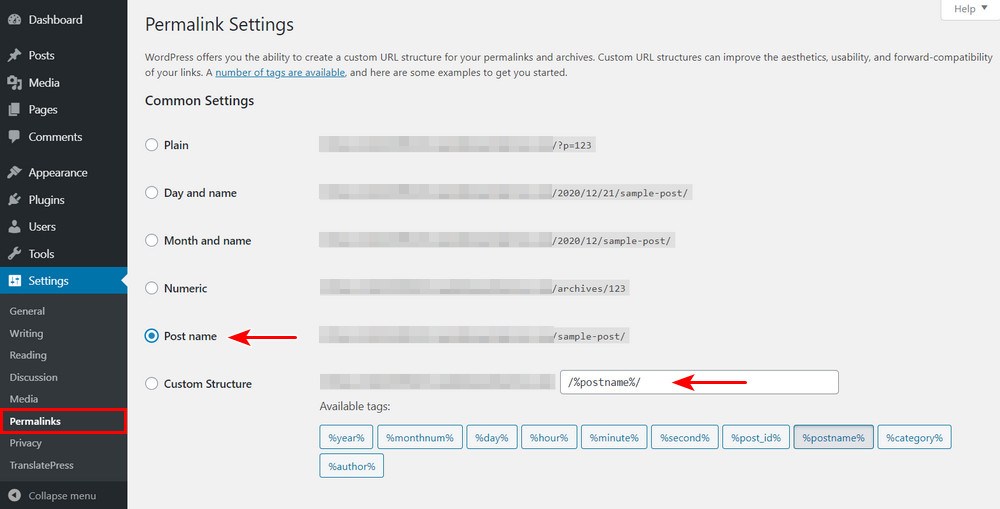
- Select Settings and Permalinks from the left menu of your WordPress dashboard
- Select Post Name from the common settings part. Alternatively, enter ‘/%postname%/’ into the Custom Structure box as they are the same thing
- Select Save Changes at the bottom of the page
Adding and Customizing a WordPress Language Switcher
The WordPress Language Switcher setting is configured automatically but you can change it if you like.
- Select Settings and TranslatePress from the WordPress dashboard to access the settings menu
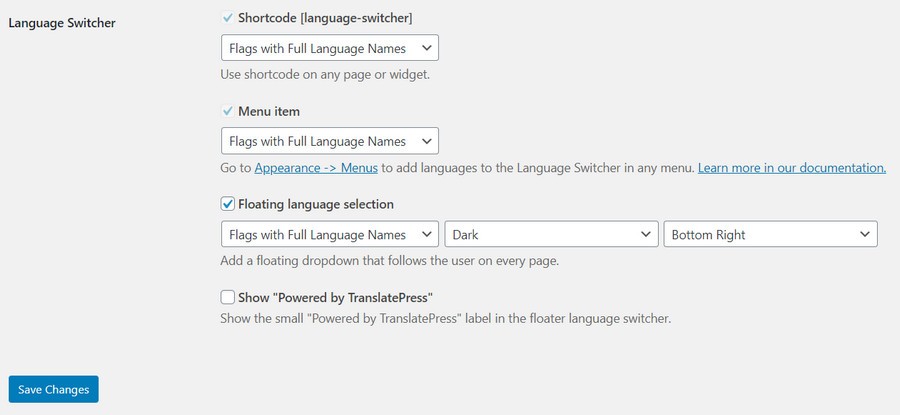
- Locate Language Switcher and check your options
- Select the display option you like most and configure
- Select the blue Save Changes button when you’re done
You have several options to choose from. There is no best option here, just the one you like the most or fits into your web design.
Translating Your Site Content Visually
The really smart part about TranslatePress is the visual translator. If you’re familiar with the WordPress visual editor, you will find working with this tool easy.
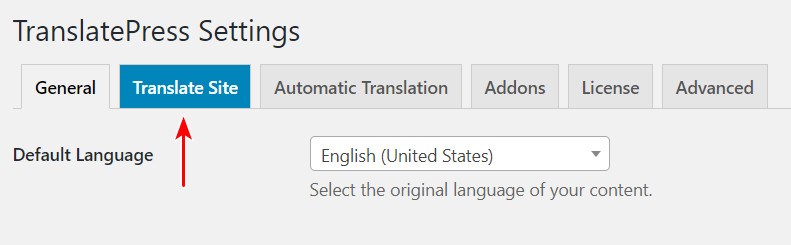
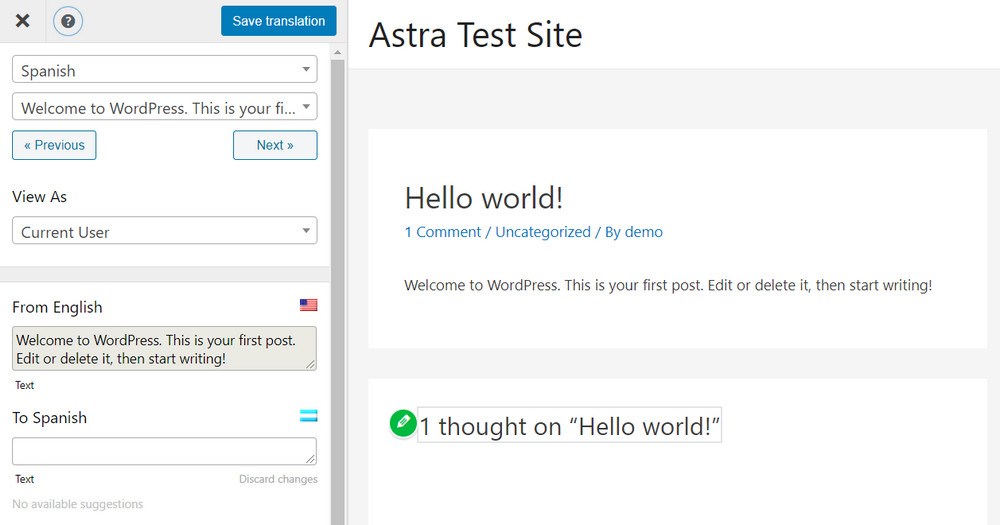
- Select the blue Translate Site tab from within the TranslatePress options page in WordPress. A new page will open with your website home page in a visual editor-style window.
- Rather than styling options in the left pane, you will see translation options instead.
- Select a piece of content in the right pane to translate it
- Paste the translated content into the box underneath. For our earlier example, we set Spanish as the translated language. So, we would paste our translated content in the box under ‘To Spanish’.
- Repeat the above process for every piece of content on the page
- Select Save Translation when you’re done
- Repeat for every post and page on your website that you want to translate
Translating Different Elements: Menu Items, Images, Forms, Sliders and Popups
You can use exactly the same process as above to translate anything on the page using TranslatePress. That’s why we like it so much!
You will notice in the Translate Site page that you can select menus, sidebar elements, images and everything you see and interact with. Perform the same steps above for all these elements to provide the smoothest experience for visitors.
Multilingual SEO
Multilingual search engine optimization is vital if you want to target international users. As we mentioned at the top of the page, English may be the dominant language online but it is only the third most-used language in the world.
There are far more Chinese, Indian, Spanish and Arabic speakers in the world than English speakers!
If you want to appeal to a much wider market, you need to appear in the search that audience uses. You do that with multilingual SEO.
Translating the Most Important SEO Elements on a Page
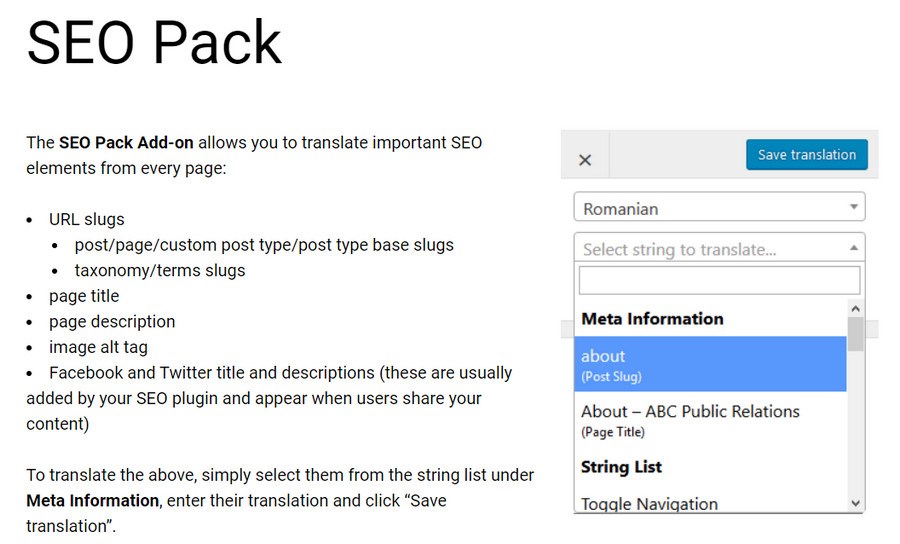
TranslatePress covers the essential page elements you’re going to want to translate but for maximum SEO coverage, you might like to explore TranslatePress SEO Pack.
TranslatePress SEO Pack will help you translate URL slugs, page titles, page descriptions, image alt tags and any social media titles and descriptions. Everything you need to cover the widest possible audience.
The TranslatePress SEO Pack addon is part of the premium plan which you will need if you want to add multiple languages and DeepL translations. It’s well worth checking out if you go that way.
Creating a Multilingual xml Sitemap With TranslatePress SEO Pack
One significant advantage of using the TranslatePress SEO Pack is the ability to create multilingual sitemaps. This is the easiest way we know of to create individual sitemaps for each translated language.
As you likely already know, a sitemap is what search engines use to figure out where to go when crawling your website. It’s a critical part of SEO and should also be part of your multilingual SEO strategy.
How To Automatically Translate Your WordPress Site?
The two main methods of translation, automatic and manual both have pros and cons. Automatic is fast and cheap, if not free, but is notoriously inaccurate. Professional manual translation is very accurate but slower and more expensive.
We consider the most effective way to translate WordPress is to use a combination of both.
Use automatic translation for the majority of your content and manual translation for more complex content. If you can also have a professional translator proofread and edit all your translations before going live, all the better!
How To Set up Google Translate and DeepL in TranslatePress?
You may remember from our initial setup of TranslatePress, that you had two options for automatic translation, Google Translate v2 or DeepL.
If you use the free version of TranslatePress, you will only be able to select Google Translate. If you use the premium version, you can select Google Translate or DeepL.
Whichever option you choose, you will need an API for translation to work.
- Instructions for getting a Google Translate API key
- Instructions for getting a DeepL API key
The steps involve creating an account if necessary and generating a key. Once you have the key, you need to install it into TranslatePress.
- Select Settings and TranslatePress from the WordPress dashboard
- Select the Automatic Translation tab at the top of the page
- Select your Translation Engine and enter the corresponding key underneath
- Select the blue Save Changes button to activate the key
Pay particular attention to the limiting usage instruction for both Google Translate and DeepL. Excessive use can become expensive so make sure you follow the instructions carefully!
Translate Your WooCommerce Store
So far, we have translated your website but not your WooCommerce store. That’s what we’ll tackle next. Fortunately, the process is exactly the same as translating posts and pages.
Navigate to a page and select the Translate Page in the WordPress admin bar at the top or select Translate Site from within the TranslatePress settings page.
Then:
- Select a piece of content in the right pane
- Paste the translated content into the ‘To Language’ box underneath
- Repeat the above process for everything on the page
- Select Save Translation.
You can translate everything from the name, description, call to action, cart button and everything you’re likely to need to change.
Be aware though, if you’re translating a page with several options, you will need to manually select each option and add the relevant translation.
For example, if you’re selling clothing, you will need to add a separate translation for every size and for every colour. Whatever options your products have, you will need to select each one in the translation window and add a translation for it.
Translating WordPress Websites
As you can see, while there is a lot involved in translating WordPress, it doesn’t have to be complicated or laborious. The hard part is acquiring the translated text in order to use it.
If you follow our recommendation on combining automatic translation with professional translated content and a final proofread by a human translator, you can offer a high quality international website for a relatively low cost.
If that could increase your potential audience by a significant amount, we think that’s an investment well worth making!